Hello polish lovers!
Just a quick post to let you know about the amazing giveaway that nailpolishcanada.com is having right now. They asked bloggers like me to choose polishes to add to this giveaway and it is truly amazing. There are currently 186 polishes to be won!
You can enter by clicking on this link here
I wish everyone good luck!
Until next time, polish happy!
Thursday, 7 August 2014
Monday, 2 June 2014
First Emily de Molly Stamping...Lead Light Technique
Hello polish lovers!
I know, I know...bad blogger. I have been doing my nails and taking photos but not editing or posting. I am going to try to get back into the swing of things. I really need to find some of the new polish that has been released for summer. I didn't find many of the spring polishes spoke to me or were anything new.
Today I have a mani that I did a few weeks ago when I got my Emily de Molly plates from MessyMansion. I am addicted! I have 4 of the 5 available and I love them all. This was plate EDM03.
I started with 2 coats of OPI My Boyfriend Scales Walls, which I will not show because I know I have posted about it before. It is my favourite white, kind of dirty and gray for when you don't want it to be too bright.
I used Mundo de Unas black stamping polish...by the way I am loving all the stamping polishes of hers that I have tried so far...except peach...but that is for another post.
Once I stamped my image I used Sinful Colors GoGo Girl, China Glaze Keepin' it Teal, China Glaze Ride the Waves and OPI Need Sunglasses and a small dotting tool to fill in random spaces.

I have done a few more using this technique since then that I really enjoy as well. I love the Frank Lloyd Wright-ness of this plate. All the images are crisp and transfer perfectly from the stamper to the nail.
That is all for today, until next time, polish happy!
I know, I know...bad blogger. I have been doing my nails and taking photos but not editing or posting. I am going to try to get back into the swing of things. I really need to find some of the new polish that has been released for summer. I didn't find many of the spring polishes spoke to me or were anything new.
Today I have a mani that I did a few weeks ago when I got my Emily de Molly plates from MessyMansion. I am addicted! I have 4 of the 5 available and I love them all. This was plate EDM03.
I started with 2 coats of OPI My Boyfriend Scales Walls, which I will not show because I know I have posted about it before. It is my favourite white, kind of dirty and gray for when you don't want it to be too bright.
I used Mundo de Unas black stamping polish...by the way I am loving all the stamping polishes of hers that I have tried so far...except peach...but that is for another post.
Once I stamped my image I used Sinful Colors GoGo Girl, China Glaze Keepin' it Teal, China Glaze Ride the Waves and OPI Need Sunglasses and a small dotting tool to fill in random spaces.
I have done a few more using this technique since then that I really enjoy as well. I love the Frank Lloyd Wright-ness of this plate. All the images are crisp and transfer perfectly from the stamper to the nail.
That is all for today, until next time, polish happy!
Sunday, 18 May 2014
Long Overdue LVX First Impressions and Review
Hello polish lovers!
Sorry for the long absence but I was involved in some pretty intense renovations...they kind of tried to destroy my nails so they are shorter than I like them.
As the title says, this is a long overdue first impressions and review of LVX polishes. I was at Marshalls one day and found some of these polishes, all from last year's Spring and Summer lines. At first I only bought 2 because I had never found the brand to buy in store before and I didn't know what the quality was like. I also don't think I could pay $16 for a single polish....it would have to be pretty damn amazing and last more than a week with no chipping for me to even think about it. Fortunately the ones I found at Marshalls were only $7 which is much more do-able for me. The first 2 I got were Celeste and Viridian. (WARNING: These photo's were taken months ago when my dominant hand was not usable so the clean up is not as good as normal, also please excuse the awkward hand position...really difficult for me to photograph my left hand.)

Celeste is a gorgeous soft grey'd out light blue...opaque in 2 coats and lasted on me for 4 days before it began to chip. This was the first I tried and made me go back to Marshalls for as many other colours I could find.

Viridian, sorry the sunshine kind of washed it out and made it much brighter than it is IRL, this is a gorgeous medium toned green, the kind that my camera kind of looks at and cries about, could not get a colour accurate photo to save my life. This was also opaque in 2 coats.
On my next trip to Marshalls I found Modena, Citrine, Azalea, Chambord and Indigo Bleu.

Azalea, pretty pink based lilac, similar to Pantone's Radiant Orchid colour of the year. This had the best formula of the great formula's and was opaque in 1 coat.

Chambord is a deep raspberry colour, opaque in 2 coats and very pigmented.

Citrine is the only one of the bunch with a weak formula but it is a yellow...a mustard-y yellow but yellow none the less. This was 3 coats to become opaque but applied smoothly like all the other colours.

Indigo Bleu was just as pigmented as the other colours but stained quite badly on removal. You have to make sure not to re-use your cotton round or you will never get it off your cuticles. The gorgeous purple/blue depending on lighting is totally work the extra mess though. This is also 2 coats.

Modena is the last swatch I have for you. An amazing bright poppy red. 2 coats, clean up was difficult, this one stains worse than Indigo Bleu, and not just your cuticles but nails too. Definitely need to double up on base coat before I use this one again, but sooo pretty, and I am not a lover of reds.
I was later able to find Fantom, a white, and Cerulean, a royal blue at Winners, but have not swatched these yet.
Overall I was incredibly impressed with the quality and pigmentation of these polishes and hope that I manage to find more on other outings.
That is all for today.
Until next time, polish happy!
Sorry for the long absence but I was involved in some pretty intense renovations...they kind of tried to destroy my nails so they are shorter than I like them.
As the title says, this is a long overdue first impressions and review of LVX polishes. I was at Marshalls one day and found some of these polishes, all from last year's Spring and Summer lines. At first I only bought 2 because I had never found the brand to buy in store before and I didn't know what the quality was like. I also don't think I could pay $16 for a single polish....it would have to be pretty damn amazing and last more than a week with no chipping for me to even think about it. Fortunately the ones I found at Marshalls were only $7 which is much more do-able for me. The first 2 I got were Celeste and Viridian. (WARNING: These photo's were taken months ago when my dominant hand was not usable so the clean up is not as good as normal, also please excuse the awkward hand position...really difficult for me to photograph my left hand.)
Celeste is a gorgeous soft grey'd out light blue...opaque in 2 coats and lasted on me for 4 days before it began to chip. This was the first I tried and made me go back to Marshalls for as many other colours I could find.
Viridian, sorry the sunshine kind of washed it out and made it much brighter than it is IRL, this is a gorgeous medium toned green, the kind that my camera kind of looks at and cries about, could not get a colour accurate photo to save my life. This was also opaque in 2 coats.
On my next trip to Marshalls I found Modena, Citrine, Azalea, Chambord and Indigo Bleu.
Azalea, pretty pink based lilac, similar to Pantone's Radiant Orchid colour of the year. This had the best formula of the great formula's and was opaque in 1 coat.
Chambord is a deep raspberry colour, opaque in 2 coats and very pigmented.
Citrine is the only one of the bunch with a weak formula but it is a yellow...a mustard-y yellow but yellow none the less. This was 3 coats to become opaque but applied smoothly like all the other colours.
Indigo Bleu was just as pigmented as the other colours but stained quite badly on removal. You have to make sure not to re-use your cotton round or you will never get it off your cuticles. The gorgeous purple/blue depending on lighting is totally work the extra mess though. This is also 2 coats.
Modena is the last swatch I have for you. An amazing bright poppy red. 2 coats, clean up was difficult, this one stains worse than Indigo Bleu, and not just your cuticles but nails too. Definitely need to double up on base coat before I use this one again, but sooo pretty, and I am not a lover of reds.
I was later able to find Fantom, a white, and Cerulean, a royal blue at Winners, but have not swatched these yet.
Overall I was incredibly impressed with the quality and pigmentation of these polishes and hope that I manage to find more on other outings.
That is all for today.
Until next time, polish happy!
Friday, 25 April 2014
NPC Day 9: Had to Have it, Still Haven't Worn it
Hello polish lovers!
Today's prompt in the challenge is Had to Have it, Still Haven't Worn it. When I saw this prompt I immediately knew which one I would use. KB Shimmer's You Autumn Know, from the Fall 2013 collection. I had to wait through 2 restocks on Harlow & Co., in order to get this. I immediately fell in love with the swatches I was online and was so happy when I was finally able to get it. I did use it as an accent once but for some reason I never did a full mani.

I love this polish! This is 3 coats. You Autumn Know is a white jelly base loaded with gold, orange and purple hex glitters in 3 different sizes mixed with orange and purple micro bar glitter. I am usually not a fan of bar glitter but this is soo small that it doesn't bother me.

So pretty. Although this is from a fall collection the colours work very well for spring as well. I think the reason that I had not worn this before is I am so hesitant to use glitters because I hate dealing with the removal process. I am going to have to get over it, because this is so pretty and soft.
That is all for today, I will be back Monday with the Most Expensive prompt, if I do not post Sunday.
Tomorrow I am going to the Maple Syrup Festival in Elmvale, a small town about 20 mins from my home. I went for the first time last year with my sister and loved it so I am really looking forward to this year. Not only will I be coming home with many maple syrup products but last year there was a Kleancolor vendor so I am hoping he is back so I can pick up a few more for my collection.
Until then, polish happy!
Today's prompt in the challenge is Had to Have it, Still Haven't Worn it. When I saw this prompt I immediately knew which one I would use. KB Shimmer's You Autumn Know, from the Fall 2013 collection. I had to wait through 2 restocks on Harlow & Co., in order to get this. I immediately fell in love with the swatches I was online and was so happy when I was finally able to get it. I did use it as an accent once but for some reason I never did a full mani.
I love this polish! This is 3 coats. You Autumn Know is a white jelly base loaded with gold, orange and purple hex glitters in 3 different sizes mixed with orange and purple micro bar glitter. I am usually not a fan of bar glitter but this is soo small that it doesn't bother me.
So pretty. Although this is from a fall collection the colours work very well for spring as well. I think the reason that I had not worn this before is I am so hesitant to use glitters because I hate dealing with the removal process. I am going to have to get over it, because this is so pretty and soft.
That is all for today, I will be back Monday with the Most Expensive prompt, if I do not post Sunday.
Tomorrow I am going to the Maple Syrup Festival in Elmvale, a small town about 20 mins from my home. I went for the first time last year with my sister and loved it so I am really looking forward to this year. Not only will I be coming home with many maple syrup products but last year there was a Kleancolor vendor so I am hoping he is back so I can pick up a few more for my collection.
Until then, polish happy!
Wednesday, 23 April 2014
NPC Day 8: Boutique Untried
Hello polish lovers!
Today's prompt is using boutique untrieds, like Butter London, A England, Deborah Lippmann and others. I took this prompt to mean more exlusive/expensive polish without being a luxury, designer brand. I chose Butter London and A England for this prompt.

This is 1 coat of Butter London Billy No Mates! How have I not used this polish! And for it to be a 1 coater! So good. I love this tone of grey. Once this was dry I used MoYou London Suki Collection Plate 01 and A England Dorian Gray.

Another polish that I can't believe I haven't used. Dorian Grey almost looks like blackened steel on the nails...gorgeous! I love the combination of the two cool tones with the organic nature scene. I also love owls so, double win.
That is all for tonight, except to share that I got my first order of Mundo de Unas stamping polish and I am super impressed. I will also have an Indie review for you soon of 3 Guilty Pleasures Polish's that arrived today as well. A double nail mail day, for the win!
I will be back on Friday with the next prompt of Had to Have it, still Haven't Worn it.
Until then, polish happy!
Today's prompt is using boutique untrieds, like Butter London, A England, Deborah Lippmann and others. I took this prompt to mean more exlusive/expensive polish without being a luxury, designer brand. I chose Butter London and A England for this prompt.
This is 1 coat of Butter London Billy No Mates! How have I not used this polish! And for it to be a 1 coater! So good. I love this tone of grey. Once this was dry I used MoYou London Suki Collection Plate 01 and A England Dorian Gray.
Another polish that I can't believe I haven't used. Dorian Grey almost looks like blackened steel on the nails...gorgeous! I love the combination of the two cool tones with the organic nature scene. I also love owls so, double win.
That is all for tonight, except to share that I got my first order of Mundo de Unas stamping polish and I am super impressed. I will also have an Indie review for you soon of 3 Guilty Pleasures Polish's that arrived today as well. A double nail mail day, for the win!
I will be back on Friday with the next prompt of Had to Have it, still Haven't Worn it.
Until then, polish happy!
Monday, 21 April 2014
NPC Day 7: Drugstore Untried
Hello polish lovers!
Today's prompt in the challenge is using a drugstore untried. I decided to use three. I started with a base of 2 coats of Sally Hansen Xtreme Wear Coin Flip, a copper foil finish.

I am trying a new position so that I can show more polish detail. Also you will notice this is my swatching hand again. My broken middle finger nail has, although still broken, and held together with Super Glue, grown out enough that I cut down the other nails so they are almost the same length. That weird bit on the side is the glue holding the split together, I need to file it down more.
Once Coin Flip had completely dried I got out the Scotch tape and cut triangles to section off the nail. The triangles that remained I filled with Mint Sorbet, a minty green creme, and Strobe Light, a pink and holographic micro glitter.

Strobe Light is not really showing well, except as the flash of sparkle. Next time I will definitely use it with a creme to make it stand out more. I was really impressed with the formulas on all the polishes used. They were all Sally Hansen Xtreme Wear. I am usually impressed with the Sally Hansen brand. I can't believe I left them untried for so long.
That is all for today but I will be back on Wednesday with my Day 8, Boutique Untried...I really shouldn't have any but have more than I thought.
Until then, polish happy!
Today's prompt in the challenge is using a drugstore untried. I decided to use three. I started with a base of 2 coats of Sally Hansen Xtreme Wear Coin Flip, a copper foil finish.
I am trying a new position so that I can show more polish detail. Also you will notice this is my swatching hand again. My broken middle finger nail has, although still broken, and held together with Super Glue, grown out enough that I cut down the other nails so they are almost the same length. That weird bit on the side is the glue holding the split together, I need to file it down more.
Once Coin Flip had completely dried I got out the Scotch tape and cut triangles to section off the nail. The triangles that remained I filled with Mint Sorbet, a minty green creme, and Strobe Light, a pink and holographic micro glitter.
Strobe Light is not really showing well, except as the flash of sparkle. Next time I will definitely use it with a creme to make it stand out more. I was really impressed with the formulas on all the polishes used. They were all Sally Hansen Xtreme Wear. I am usually impressed with the Sally Hansen brand. I can't believe I left them untried for so long.
That is all for today but I will be back on Wednesday with my Day 8, Boutique Untried...I really shouldn't have any but have more than I thought.
Until then, polish happy!
Saturday, 19 April 2014
NPC Day 6: Indie Untried
Hello polish lovers!
So I don't buy many Indie polishes...and when I do I make sure they are ones that I am going to like, so this prompt was difficult for me. I decided to use my most recent Indie, which is one that I loved but have not reviewed here yet.
This is Rainbow Honey's Tera Flare from the Final Battle collection based around Final Fantasy.

I love, love, love, this polish! It is a dark navy jelly base with scattered multi-coloured holographic glitter squares and hexes. This is my first polish with square glitter and I am now addicted! So gorgeous! Looking at these photos when I was editing them just makes me want to put it on. This is 3 easy coats with 1 coat of SV.

OH MY GLOB! So pretty! I will definitely be wearing this again.
That is all for now. I will be back on Monday with my Drugstore Untried.
Until then, polish happy!
So I don't buy many Indie polishes...and when I do I make sure they are ones that I am going to like, so this prompt was difficult for me. I decided to use my most recent Indie, which is one that I loved but have not reviewed here yet.
This is Rainbow Honey's Tera Flare from the Final Battle collection based around Final Fantasy.
I love, love, love, this polish! It is a dark navy jelly base with scattered multi-coloured holographic glitter squares and hexes. This is my first polish with square glitter and I am now addicted! So gorgeous! Looking at these photos when I was editing them just makes me want to put it on. This is 3 easy coats with 1 coat of SV.
OH MY GLOB! So pretty! I will definitely be wearing this again.
That is all for now. I will be back on Monday with my Drugstore Untried.
Until then, polish happy!
NPC Day 5: Jelly
Hello polish lovers!
This is going to be a quick one. Day 5 Prompt is Jelly and I chose to do a pond mani using China Glaze Keepin' it Teal. This is a very sheer teal green that is another in my collection that I will have to try with LeadLighting.
I used the ant image from Pueen 45 and Kleancolor Matte Black and layered and repeated the image at different angles, layered with coats of Keepin' it Teal. I don't know if it was a total success but I don't mind the finished product. This is 5 coats total and you still have slight VNL so that will tell you how sheer it is.
That is all for now.
Until next time, polish happy!
NPC Day 4: Frost
Hello polish lovers!
Back with the next challenge of finding a Frost untried in my stash. I am not a fan of frost finishes as a rule, I tend to find them rather dated. I did manage to find one in my stash, a Joe Fresh Polish (the brand my local grocery store sells) and besides being a frost finish, the polish is actually called Frost!

Super, super sheer! This is 3 coats. Since I hate seeing my own VNL I decided to create a funky french tip using my Art Club by Color Club pastel stripers. The colours I chose, pink and purple, also happen to have a frost finish.
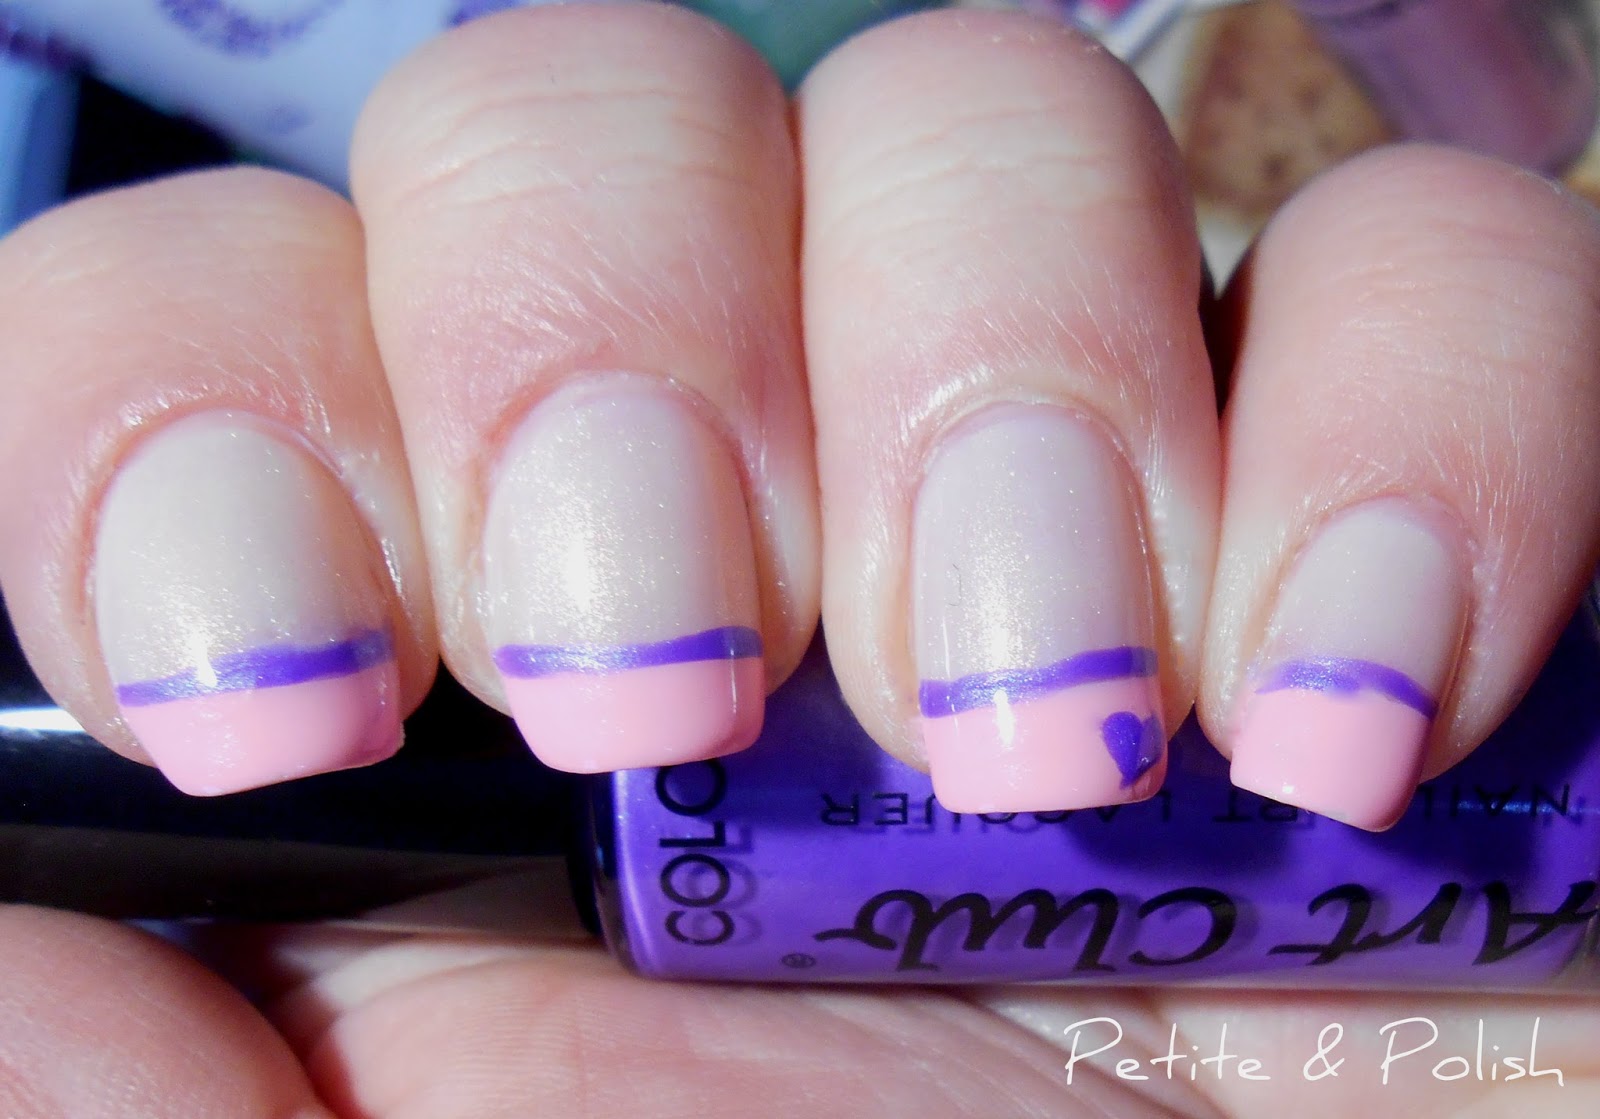
Sorry it is soo over-exposed but I am not used to having sunlight to take my photos in yet. Please remember that I am left handed and was using my left hand for this so the lines are not as crisp as they would be if I were painting my right hand. My poor broken nail on my right hand is getting better, but is not to the length I want yet.
That's all for now, I will be back soon with my untried Jelly.
Until then, polish happy!
Back with the next challenge of finding a Frost untried in my stash. I am not a fan of frost finishes as a rule, I tend to find them rather dated. I did manage to find one in my stash, a Joe Fresh Polish (the brand my local grocery store sells) and besides being a frost finish, the polish is actually called Frost!
Super, super sheer! This is 3 coats. Since I hate seeing my own VNL I decided to create a funky french tip using my Art Club by Color Club pastel stripers. The colours I chose, pink and purple, also happen to have a frost finish.
Sorry it is soo over-exposed but I am not used to having sunlight to take my photos in yet. Please remember that I am left handed and was using my left hand for this so the lines are not as crisp as they would be if I were painting my right hand. My poor broken nail on my right hand is getting better, but is not to the length I want yet.
That's all for now, I will be back soon with my untried Jelly.
Until then, polish happy!
NPC Day 3: Random Untried
Hello polish lovers!
So I am really behind this week on the challenge so I will be posting 3 times today. First the Random Untried. I took random to mean a polish that I only had one example of the brand and it is one that I received from a giveaway. It is even more random in that it does not have a name, although the tag claims it is a limited edition colour. The brand is Rue Beaute and it came in a skull shaped bottle with a silver cap.
When i took the brush out of this polish I noticed how sheer it was and so started with a base of OPI Alpine Snow. It took 3 coats of the neon pink polish to get opaque enough that you could not see colour variance streaks.

I can see this working for the LeadLight technique for stamping but it is way too many coats for a base colour for me. Once this was dry I got out another untried, Kleancolor's Matte Black, for the stamping, using MASH 45(please excuse the mess of my middle finger but matte polish dries very quickly and the entire image did not transfer, so I re-stamped...with not great results).

I think this polish is not going to become a favourite, but I will try it for LeadLight and let you see the results.
Back in a few with Day 4.
Until then, polish happy!
So I am really behind this week on the challenge so I will be posting 3 times today. First the Random Untried. I took random to mean a polish that I only had one example of the brand and it is one that I received from a giveaway. It is even more random in that it does not have a name, although the tag claims it is a limited edition colour. The brand is Rue Beaute and it came in a skull shaped bottle with a silver cap.
When i took the brush out of this polish I noticed how sheer it was and so started with a base of OPI Alpine Snow. It took 3 coats of the neon pink polish to get opaque enough that you could not see colour variance streaks.
I can see this working for the LeadLight technique for stamping but it is way too many coats for a base colour for me. Once this was dry I got out another untried, Kleancolor's Matte Black, for the stamping, using MASH 45(please excuse the mess of my middle finger but matte polish dries very quickly and the entire image did not transfer, so I re-stamped...with not great results).
I think this polish is not going to become a favourite, but I will try it for LeadLight and let you see the results.
Back in a few with Day 4.
Until then, polish happy!
Wednesday, 9 April 2014
NPC Day 2: Pastel
Hello polish lovers!
Today I have my Pastel mani from the Never-ending Pile Challenge. I was originally going to to a more intricate design with a gradient of three colours and then my stamping with a fourth but I ended up running out of time and did not wait long enough before the sponging and it removed my white base in spots. There is nothing to do in this situation except start over, and since we were going to see the new Captain America after dinner, I did not have enough time. So here is my simplified mani using 2 untrieds from the Formula X line.
I started with a base of 2 coats of Unmistakable, a pastel green-blue(looks more green IRL).
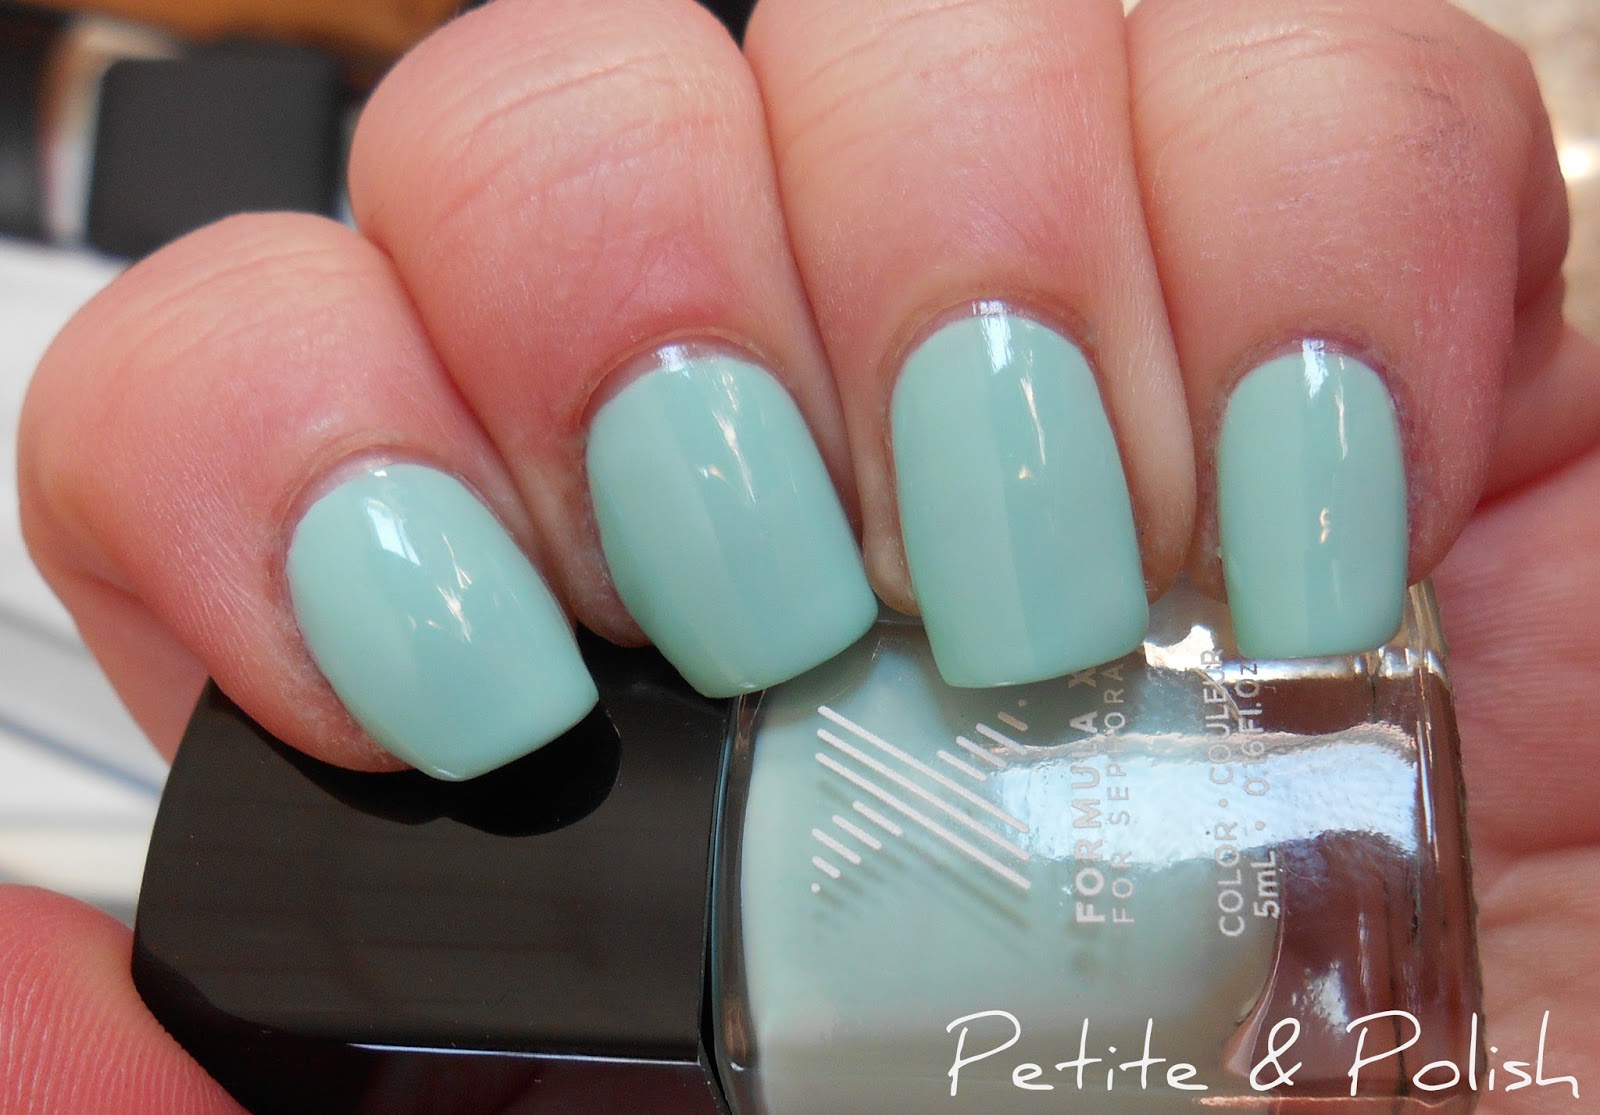
This is a very pretty polish and would not be untried except for the fact that the first time I tried the Formula X line the polish began chipping almost immediately so I avoided it. This time I did not use a base coat and it adhered to my nail much better. I will have to experiment with my base coats because I hate not using them, that last thing I want is stained nails.
Once this was dry I added my stamping, using another untried, Formula X Brazen, a pastel blue-toned pink. If I did this again I would use a brighter polish for the stamping because the tones for Unmistakable and Brazen were too similar and the stamping did not show up as clearly as I like. The plate is MoYou London Pro Collection 02.

You can see a slight difference in colour in the 2 photo's as one was taken using natural light and the second is in my light box. The first is more colour accurate.

First ever close up, but I wanted you to see the prettiness of the flowers.
That is all for today, but I will be back on Friday...probably late...with the Day 3 prompt of Random Untried...I have no idea what that will be yet.
Until then, polish happy!
Today I have my Pastel mani from the Never-ending Pile Challenge. I was originally going to to a more intricate design with a gradient of three colours and then my stamping with a fourth but I ended up running out of time and did not wait long enough before the sponging and it removed my white base in spots. There is nothing to do in this situation except start over, and since we were going to see the new Captain America after dinner, I did not have enough time. So here is my simplified mani using 2 untrieds from the Formula X line.
I started with a base of 2 coats of Unmistakable, a pastel green-blue(looks more green IRL).
This is a very pretty polish and would not be untried except for the fact that the first time I tried the Formula X line the polish began chipping almost immediately so I avoided it. This time I did not use a base coat and it adhered to my nail much better. I will have to experiment with my base coats because I hate not using them, that last thing I want is stained nails.
Once this was dry I added my stamping, using another untried, Formula X Brazen, a pastel blue-toned pink. If I did this again I would use a brighter polish for the stamping because the tones for Unmistakable and Brazen were too similar and the stamping did not show up as clearly as I like. The plate is MoYou London Pro Collection 02.
You can see a slight difference in colour in the 2 photo's as one was taken using natural light and the second is in my light box. The first is more colour accurate.
First ever close up, but I wanted you to see the prettiness of the flowers.
That is all for today, but I will be back on Friday...probably late...with the Day 3 prompt of Random Untried...I have no idea what that will be yet.
Until then, polish happy!
Monday, 7 April 2014
The Neverending Pile, Day 1: Glitter
Hello polish lovers!
Today I have my first post in the new Challenge I am participating in, called The Neverending Pile Challenge (NPC), which means I need to get into posting more frequently(every Monday, Wednesday and Friday). It also means my untried pile will finally shrink. Today's prompt is Glitter.
I am not a huge glitter fan, so most of what I have I either bought because I loved it, came as part of a set, or my mother bought them for me. The one that I chose is one that I got as part of a set. This is Color Club's Savoy Nights.

Savoy Nights has a thick base that is lightly tinted blue but is totally translucent with tonnes and tonnes of micro and medium silver hex glitter. Please excuse my messed up pinky, it smudged before I took my first photo. It took 3 coats to be opaque...it might be better if I did a base first, because the first coat when the glitter was scattered actually looked pretty.
I can see why this was an untried, it is not a win, it looks too messy and all the medium hex glitter seems to have curled. This may be one that I give to my niece, now that I have tried it.
That is all for today, but I will be back on Wednesday with the next prompt, which is pastel.
Until then, polish happy!
Today I have my first post in the new Challenge I am participating in, called The Neverending Pile Challenge (NPC), which means I need to get into posting more frequently(every Monday, Wednesday and Friday). It also means my untried pile will finally shrink. Today's prompt is Glitter.
I am not a huge glitter fan, so most of what I have I either bought because I loved it, came as part of a set, or my mother bought them for me. The one that I chose is one that I got as part of a set. This is Color Club's Savoy Nights.
Savoy Nights has a thick base that is lightly tinted blue but is totally translucent with tonnes and tonnes of micro and medium silver hex glitter. Please excuse my messed up pinky, it smudged before I took my first photo. It took 3 coats to be opaque...it might be better if I did a base first, because the first coat when the glitter was scattered actually looked pretty.
I can see why this was an untried, it is not a win, it looks too messy and all the medium hex glitter seems to have curled. This may be one that I give to my niece, now that I have tried it.
That is all for today, but I will be back on Wednesday with the next prompt, which is pastel.
Until then, polish happy!
Friday, 4 April 2014
Cat vs. Bird Nails
Hello polish lovers!
Sorry to be MIA for so long but I am still waiting for that damaged nail to grow out on my swatching hand and it is taking forever. Because of this I have really not been motivated to paint the non dominant, to say nothing of my freehand skills with my right hand are atrocious.
Anyway, here is a mani I did a number of weeks ago but just got around to editing the photos.

This is 2 coats of Ciate's Pepperminty, one of my favourite blue-green cremes. First coat is streaky but evens and becomes opaque with the second coat. Once this was completely dry I added my stamping. I used Konad black and MoYou London Kitty Collection 01.

I flipped the image so that you got the story in the correct order. Bird breaks free of cage, cat sees bird, cat catches bird, bird no more. I love the cat images from this plate...probably why it is not currently available.
In other news, at my local Marshalls I was able to find 7 LVX polishes...there were a few more I wanted but the first time I was there I had never tried the brand and did not want to go overboard, so I only bought 2...then I was blown away by the formula, application and longevity of the polish and so went back. Unfortunately 2 of the colours that I wanted to get had been sold, so I could only get the 5 remaining. I have swatched them all and now need to edit all the photos, so I may have a LVX post for you tomorrow.
Until then, polish happy!
Sorry to be MIA for so long but I am still waiting for that damaged nail to grow out on my swatching hand and it is taking forever. Because of this I have really not been motivated to paint the non dominant, to say nothing of my freehand skills with my right hand are atrocious.
Anyway, here is a mani I did a number of weeks ago but just got around to editing the photos.
This is 2 coats of Ciate's Pepperminty, one of my favourite blue-green cremes. First coat is streaky but evens and becomes opaque with the second coat. Once this was completely dry I added my stamping. I used Konad black and MoYou London Kitty Collection 01.
I flipped the image so that you got the story in the correct order. Bird breaks free of cage, cat sees bird, cat catches bird, bird no more. I love the cat images from this plate...probably why it is not currently available.
In other news, at my local Marshalls I was able to find 7 LVX polishes...there were a few more I wanted but the first time I was there I had never tried the brand and did not want to go overboard, so I only bought 2...then I was blown away by the formula, application and longevity of the polish and so went back. Unfortunately 2 of the colours that I wanted to get had been sold, so I could only get the 5 remaining. I have swatched them all and now need to edit all the photos, so I may have a LVX post for you tomorrow.
Until then, polish happy!
Monday, 17 March 2014
St. Paddy's Mani
Hello polish lovers! Happy St. Patrick's Day!
So I had a pretty major break in my middle nail of my swatching hand a few weeks ago and I have been nursing it ever since...unfortunately it decided to break all the way back to the start of my free edge and I got fed up and cut it right down. So you know what that means, awkward photos using my non dominant hand(which means no freehand art) and slightly crappy clean up until my middle nail grows out enough to not be a tiny mini nubbin. There will also be a few posts of mani's I did weeks ago, so if you see righty making an appearance, that is why.
On to my St. Paddy's day mani. I started with 3 coats of Sally Hansen Triple Shine, Kelp Out. If you are interested you can see my original review here.

I then got out my Bundle Monster plates and used BMH04 and BMH05 with Klean Color Metallic Yellow and Konad black for my stamping.

I decided to go with a double accent since I wanted more of the green to show. I especially love my index finger, the metallic yellow really caught the light and added extra interest.
That is all for today but I will be back soon.
Until then, polish happy!
So I had a pretty major break in my middle nail of my swatching hand a few weeks ago and I have been nursing it ever since...unfortunately it decided to break all the way back to the start of my free edge and I got fed up and cut it right down. So you know what that means, awkward photos using my non dominant hand(which means no freehand art) and slightly crappy clean up until my middle nail grows out enough to not be a tiny mini nubbin. There will also be a few posts of mani's I did weeks ago, so if you see righty making an appearance, that is why.
On to my St. Paddy's day mani. I started with 3 coats of Sally Hansen Triple Shine, Kelp Out. If you are interested you can see my original review here.
I then got out my Bundle Monster plates and used BMH04 and BMH05 with Klean Color Metallic Yellow and Konad black for my stamping.
I decided to go with a double accent since I wanted more of the green to show. I especially love my index finger, the metallic yellow really caught the light and added extra interest.
That is all for today but I will be back soon.
Until then, polish happy!
Wednesday, 12 March 2014
China Glaze City Flourish and Sea Goddess Collections, First Impressions and Review
Hello polish lovers!
Sorry I have been absent for a while but I think the last challenge had me on posting overload so I took a bit of a vacation when it was over.
Today I have 4 polishes from China Glaze Spring Collection City Flourish and 1 polish from the Sea Goddess Collection.
I will start with the City Flourish collection.

So I finally got around to creating a light box so I am hoping that will help with how uneven my lighting has been.
I purchased these colours when Sally Beauty had China Glaze on their 1 day sale in February, and have used them in mani's since but have not yet told you what I thought of them.
First up is In a Lily Bit.

In a Lily Bit is a lilac cream polish with a strong pink undertone. The formula is thin but not overly difficult to work with and requiring minimal clean up, the first coat is streaky but is opaque on the second coat. The polish is one of those neon pastels and does dry matte so it does require top coat. This is 2 coats topped with Seche Vite. I normally avoid this shade but the brightness stops the lobster fingers.
Second is What a Pansy.

What a Pansy is definitely my favourite name of the collection, although it is not my favourite polish. What a Pansy is a mid-tone purple with strong blue under-tone. The formula is thicker than In a Lily Bit and would be a 1 coat-er if the application was not slightly patchy, fully opaque in 2 coats. This one does not dry matte and the above picture is 2 coats with no clean up and no top coat.
Third is At Vase Value.

At Vase Value is a light blue that shares its value range with For Audrey, and shows slightly more green IRL. The 1st coat is streaky but is opaque in 2. This dries with the same matte finish as In a Lily Bit and this photo is 2 coats with Seche Vite.
Last is Grass is Lime Greener.

Colour-wise, Grass is Lime Greener is my favourite of the collection...but of course it has the worst formula. It is both patchy and streaky and uneven with 2 fingers requiring a third coat. It is the most neon pastel of the collection and I do not have anything comparable by other brands. It dries with the same matte finish and this is 2-3 coats(depending on the finger) topped with Seche Vite.
Next I will show you the 1 polish I purchased from the Sea Goddess Collection: Wish on a Starfish.

Cute name and a very pretty polish. The Sea Goddess collection is the first China Glaze has released that is all texture containing glitter or shimmer.

Wish on a Starfish is a pink texture polish with a ton of gold shimmer. This polish has a great formula, in that it stays exactly where you put it and requires no clean up. Unfortunately it requires 3 coats to be fully opaque and not show VNL. Drying time is on par with other texture polishes that I own(which I think is way too long and part of the reason I seldom use them). It would be interesting to put 1 coat over a pink base and top coat, just to see how much the gold shimmer really shows.
Overall I really like the China Glaze polishes for Spring. The colours are totally appropriate in their Easter Pastels, but bright enough to not look washed out. I know I will be using them all spring and a few into the summer too.
That's all for today, I will be back probably on Friday for my next post.
Until then, polish happy!
Sorry I have been absent for a while but I think the last challenge had me on posting overload so I took a bit of a vacation when it was over.
Today I have 4 polishes from China Glaze Spring Collection City Flourish and 1 polish from the Sea Goddess Collection.
I will start with the City Flourish collection.
So I finally got around to creating a light box so I am hoping that will help with how uneven my lighting has been.
I purchased these colours when Sally Beauty had China Glaze on their 1 day sale in February, and have used them in mani's since but have not yet told you what I thought of them.
First up is In a Lily Bit.
In a Lily Bit is a lilac cream polish with a strong pink undertone. The formula is thin but not overly difficult to work with and requiring minimal clean up, the first coat is streaky but is opaque on the second coat. The polish is one of those neon pastels and does dry matte so it does require top coat. This is 2 coats topped with Seche Vite. I normally avoid this shade but the brightness stops the lobster fingers.
Second is What a Pansy.
What a Pansy is definitely my favourite name of the collection, although it is not my favourite polish. What a Pansy is a mid-tone purple with strong blue under-tone. The formula is thicker than In a Lily Bit and would be a 1 coat-er if the application was not slightly patchy, fully opaque in 2 coats. This one does not dry matte and the above picture is 2 coats with no clean up and no top coat.
Third is At Vase Value.
At Vase Value is a light blue that shares its value range with For Audrey, and shows slightly more green IRL. The 1st coat is streaky but is opaque in 2. This dries with the same matte finish as In a Lily Bit and this photo is 2 coats with Seche Vite.
Last is Grass is Lime Greener.
Colour-wise, Grass is Lime Greener is my favourite of the collection...but of course it has the worst formula. It is both patchy and streaky and uneven with 2 fingers requiring a third coat. It is the most neon pastel of the collection and I do not have anything comparable by other brands. It dries with the same matte finish and this is 2-3 coats(depending on the finger) topped with Seche Vite.
Next I will show you the 1 polish I purchased from the Sea Goddess Collection: Wish on a Starfish.
Cute name and a very pretty polish. The Sea Goddess collection is the first China Glaze has released that is all texture containing glitter or shimmer.
Wish on a Starfish is a pink texture polish with a ton of gold shimmer. This polish has a great formula, in that it stays exactly where you put it and requires no clean up. Unfortunately it requires 3 coats to be fully opaque and not show VNL. Drying time is on par with other texture polishes that I own(which I think is way too long and part of the reason I seldom use them). It would be interesting to put 1 coat over a pink base and top coat, just to see how much the gold shimmer really shows.
Overall I really like the China Glaze polishes for Spring. The colours are totally appropriate in their Easter Pastels, but bright enough to not look washed out. I know I will be using them all spring and a few into the summer too.
That's all for today, I will be back probably on Friday for my next post.
Until then, polish happy!
Friday, 28 February 2014
Nail Art A-Go-Go, Day 28: Art Nouveau
Hello polish lovers!
It's the last day! I made it...with a few late posts in there, but posting every day very difficult when I don't have a set schedule at work and with this cold I am still trying to get over. So some days were better than others.
For the Art Nouveau prompt I began with 2 coats of SOPI Chestnuts About You! a gorgeous copper-y rose gold metallic.

Once this was dry I added my stamp, one of my favourites from Messy Mansion, William Morris and Friends plate MM16. I love how intricate the images on this plate are, they are very indicative of the Art Nouveau style, with flowing organic forms. I chose the grape vine image(its my favourite).

I used Konad Black to stamp with and I love how crisp the image turned out. I have used this image a number of times before and I keep going back to it.
That is all for today and the end of Gnarly Nails Nail Art A-Go-Go Challenge. I will go back to my regular mix of reviews and nail art on Sunday. There are also a few polish comparisons that I want to do as well. As well as posting about a few Awards that I have been nominated for that I have never gotten around to creating posts for.
Until then, polish happy!
It's the last day! I made it...with a few late posts in there, but posting every day very difficult when I don't have a set schedule at work and with this cold I am still trying to get over. So some days were better than others.
For the Art Nouveau prompt I began with 2 coats of SOPI Chestnuts About You! a gorgeous copper-y rose gold metallic.
Once this was dry I added my stamp, one of my favourites from Messy Mansion, William Morris and Friends plate MM16. I love how intricate the images on this plate are, they are very indicative of the Art Nouveau style, with flowing organic forms. I chose the grape vine image(its my favourite).
I used Konad Black to stamp with and I love how crisp the image turned out. I have used this image a number of times before and I keep going back to it.
That is all for today and the end of Gnarly Nails Nail Art A-Go-Go Challenge. I will go back to my regular mix of reviews and nail art on Sunday. There are also a few polish comparisons that I want to do as well. As well as posting about a few Awards that I have been nominated for that I have never gotten around to creating posts for.
Until then, polish happy!
Thursday, 27 February 2014
Nail Art A-Go-Go, Day 27: Pointillism
Hello polish lovers!
Last post of the night, and the shortest, because I am tired and fighting a bad headache.
For the Pointillism prompt I decided, of course, to use my dotting tools. I did not want to do anything representative, and so went to the basics and did overlapping dots.
I started with a base of 2 coats of Barry M Papaya(can you tell I want summer to come already?).

I then used a small dotting tool and SHID Lightening to dot all over my nails.

I repeated with SHID Lickety-Split Lime leaving an area bare.

And again with SHID Mint Sprint, moving out slightly again.

And lastly with Barielle Shades Girls Night Out, moving out again.

I then topped with SV(because I learned my lesson last time).
That is all for today(finally).
I will be back tomorrow with my final installment of this challenge, Art Nouveau.
Until then, polish happy!
Last post of the night, and the shortest, because I am tired and fighting a bad headache.
For the Pointillism prompt I decided, of course, to use my dotting tools. I did not want to do anything representative, and so went to the basics and did overlapping dots.
I started with a base of 2 coats of Barry M Papaya(can you tell I want summer to come already?).
I then used a small dotting tool and SHID Lightening to dot all over my nails.
I repeated with SHID Lickety-Split Lime leaving an area bare.
And again with SHID Mint Sprint, moving out slightly again.
And lastly with Barielle Shades Girls Night Out, moving out again.
I then topped with SV(because I learned my lesson last time).
That is all for today(finally).
I will be back tomorrow with my final installment of this challenge, Art Nouveau.
Until then, polish happy!
Nail Art A-Go-Go, Day 26: Graffiti
Hello polish lovers!
I am back with my next challenge mani, Graffiti.
When I thought about this prompt I immediately thought of the type of graffiti that was shown in the documentary, Exit Through the Gift Shop, as apposed to tagging and spray painting. When I watched that documentary I immediately fell in love with the work of a street artist using the name Space Invader. Most of Space Invader's work is tile work depicting classic 8-bit arcade game characters, like the space invaders, Pac-Man, the Pac-Man ghosts, and others. I knew I would not be able to recreate the 8-bit look with polish(although small square studs would have worked, Ah hindsight, always 20/20), so I attempted to capture more the feeling of his work.
I started with a base of 2 coats OPI Lost on Lombard, a brick red crelly. I only have the mini's from this collection, San Francisco Fall 2013.

Once this was dry I got out BM422 for the brick pattern and Kleancolor Black(I did not use Konad because I wanted the stamp to look more like a shadow and so did not want the lines too opaque). I then started in with my dotting tool a small striping brush and the following colours: SHID(Sally Hansen Insta-Dri) Blue-Away, Cobalt Blue, Kleancolor Black, Grass Green, Sinful Colors Snow Me White and Barry M Blood Orange and Key Lime.

Unfortunately I did not use SV but my Nubar Top Coat and did not wait quite long enough for the polish to dry to stop it from smudging.
That is all for this post but I will be back soon with Pointillism. The last post for today.
Until then, polish happy!
I am back with my next challenge mani, Graffiti.
When I thought about this prompt I immediately thought of the type of graffiti that was shown in the documentary, Exit Through the Gift Shop, as apposed to tagging and spray painting. When I watched that documentary I immediately fell in love with the work of a street artist using the name Space Invader. Most of Space Invader's work is tile work depicting classic 8-bit arcade game characters, like the space invaders, Pac-Man, the Pac-Man ghosts, and others. I knew I would not be able to recreate the 8-bit look with polish(although small square studs would have worked, Ah hindsight, always 20/20), so I attempted to capture more the feeling of his work.
I started with a base of 2 coats OPI Lost on Lombard, a brick red crelly. I only have the mini's from this collection, San Francisco Fall 2013.
Once this was dry I got out BM422 for the brick pattern and Kleancolor Black(I did not use Konad because I wanted the stamp to look more like a shadow and so did not want the lines too opaque). I then started in with my dotting tool a small striping brush and the following colours: SHID(Sally Hansen Insta-Dri) Blue-Away, Cobalt Blue, Kleancolor Black, Grass Green, Sinful Colors Snow Me White and Barry M Blood Orange and Key Lime.
Unfortunately I did not use SV but my Nubar Top Coat and did not wait quite long enough for the polish to dry to stop it from smudging.
That is all for this post but I will be back soon with Pointillism. The last post for today.
Until then, polish happy!
Nail Art A-Go-Go, Day 25: Watercolours
Hello polish lovers!
Today I have 3 posts for you...then I will be caught up with the Challenge...just in time for it to end. That's right, tomorrow is the last day of the current challenge so let us begin.
I will start off by saying I made 4 attempts to finish this mani in time for it to be posted on the correct day, the first looked horrible...not even a fail but just ugly. The second was going ok until I attempted to clean up and destroyed it with an inopportune sneeze. The third was my fault as I was now frustrated and did not wait long enough before attempting my gradient and ended up removing most of my base coat. The fourth is the one I will show you, still not 100% happy but at least it is not a fail.
I will not show you the base alone, I have shown it before, Sinful Colors Snow Me White. Actually one of my favourite whites as it is almost opaque in 1 coat. I use 2 to ensure no streaks.
Once this was dry(this time) I got out my trusty sponge and some Barry M polishes: Papaya, Grapefruit and Turquoise, and created a gradient.

I was attempting to recreate the look of one of the first techniques they teach you when you are learning how to paint with watercolors and that is to keep a pool of colour on you page and slowly add another colour to create a slow transition. I have to say, using a sponge is easier(as long as you wait long enough).
Once this was dry I used OPI Matte Top Coat to make it look more like paint and less like polish. I used white as a base instead of Papaya because I wanted the colour to look slightly translucent, as true watercolor does. This is also why I used mostly Barry M Gelly's, although Turquoise is not a jelly and it was the most translucent(and also the most difficult to work with).
That is all for this post but I will be back shortly with Graffiti and Pointillism.
Until then, polish happy!
Today I have 3 posts for you...then I will be caught up with the Challenge...just in time for it to end. That's right, tomorrow is the last day of the current challenge so let us begin.
I will start off by saying I made 4 attempts to finish this mani in time for it to be posted on the correct day, the first looked horrible...not even a fail but just ugly. The second was going ok until I attempted to clean up and destroyed it with an inopportune sneeze. The third was my fault as I was now frustrated and did not wait long enough before attempting my gradient and ended up removing most of my base coat. The fourth is the one I will show you, still not 100% happy but at least it is not a fail.
I will not show you the base alone, I have shown it before, Sinful Colors Snow Me White. Actually one of my favourite whites as it is almost opaque in 1 coat. I use 2 to ensure no streaks.
Once this was dry(this time) I got out my trusty sponge and some Barry M polishes: Papaya, Grapefruit and Turquoise, and created a gradient.
I was attempting to recreate the look of one of the first techniques they teach you when you are learning how to paint with watercolors and that is to keep a pool of colour on you page and slowly add another colour to create a slow transition. I have to say, using a sponge is easier(as long as you wait long enough).
 |
| Photo taken with flash |
That is all for this post but I will be back shortly with Graffiti and Pointillism.
Until then, polish happy!
Monday, 24 February 2014
Nail Art A-Go-Go, Day 24: Abstract
Hello polish lovers! Long time no post;p
Today's prompt was Abstact, and I used this as an excuse to do one of my favourite types of nail art, gradients. I worn you, I decided to include a pic of what this gradient looked like before clean up! So messy! This was inspired by 2 of my favourite Abstract artists, Rothko(who did colour fields), and Bridget Riley(who did, I want to call it, optical illusion paintings).
I created a gradient using all OPI colours, Greenwich Village, Jade is the New Black and Ski Teal We Drop....here comes the mess...

I used a new type of makeup sponge for this, I usually use the really cheap Walmart ones but I bought these on clearance at Winners and they have a much finer texture and create a smoother gradient. I use a Q-Tip and acetone to do the big clean and then finish with a small brush and more acetone.

Once this was coated in Seche Vite and completely dry I got out my MoYou London Sailor Collection 06 plate and Essie No Place Like Chrome to do some stamping.

I almost like it more before I did the stamping...I need to learn that sometimes less is more...only very occasionally, but this appears to be one of them.
That is all for today but I will be back tomorrow with the next prompt of Watercolour.
Until then, polish happy!
Today's prompt was Abstact, and I used this as an excuse to do one of my favourite types of nail art, gradients. I worn you, I decided to include a pic of what this gradient looked like before clean up! So messy! This was inspired by 2 of my favourite Abstract artists, Rothko(who did colour fields), and Bridget Riley(who did, I want to call it, optical illusion paintings).
I created a gradient using all OPI colours, Greenwich Village, Jade is the New Black and Ski Teal We Drop....here comes the mess...
I used a new type of makeup sponge for this, I usually use the really cheap Walmart ones but I bought these on clearance at Winners and they have a much finer texture and create a smoother gradient. I use a Q-Tip and acetone to do the big clean and then finish with a small brush and more acetone.
Once this was coated in Seche Vite and completely dry I got out my MoYou London Sailor Collection 06 plate and Essie No Place Like Chrome to do some stamping.
I almost like it more before I did the stamping...I need to learn that sometimes less is more...only very occasionally, but this appears to be one of them.
That is all for today but I will be back tomorrow with the next prompt of Watercolour.
Until then, polish happy!
Subscribe to:
Comments (Atom)